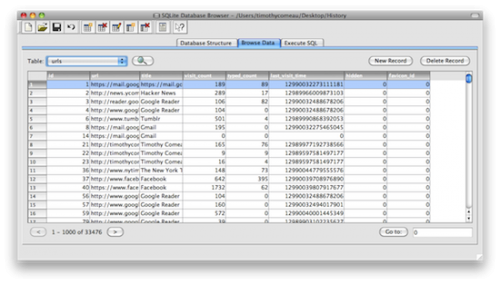
In order to poke my brain to remember a site I figured out how to hack my Chrome History, and learned that Webkit doesn’t use Unixtime. Rather, it uses a timestamp of microseconds since 1 Jan 1601.
Thus to convert from Webkit Format to a generic Unixtime, divide by a million to get seconds, then subtract the number of seconds between 1 Jan 1970 and 1 Jan 1601 (11644473600).
In order to retrieve your Chrome history for analysis within a spreadsheet, (and if you’re using OS X) do the following:
1) Copy `History` file located at
USER/Library/Application Support/Google/Chrome/Default/History
to working location, then:
2) open using SQLLite Browser,
3) export table in question to CSV (in my case, `urls`)
4) open in Excel or Numbers
5) create column next to datetime you want to work with
(`last_visit_time`)
6) apply this formula referencing the column in question
=(CELL/1000000-11644473600)/60/60/24+”1 jan 1970″
7) …and set the column to ‘Custom’ = yyyy-mm-dd h:mm
Useful links:
Decoding Google Chrome Timestamps
Converting Unix Timestamps
Webkit Time
Update June 29 2013: Reader Darlyn Perez wrote me to offer his Python script to convert a Webkit timestamp into a regular timestamp. As he says, “It basically does the same thing as the spreadsheet formula in your post.”
#!usr/bin/python

#Converts a Webkit timestamp (microseconds since Jan 1 1601) from keyboard input into a human-readable timestamp.
#Script by Darlyn Perez on 2013-06-29

import datetime
def date_from_webkit(webkit_timestamp):
    epoch_start = datetime.datetime(1601,1,1)
    delta = datetime.timedelta(microseconds=int(webkit_timestamp))
    print epoch_start + delta

inTime = int(raw_input('Enter a Webkit timestamp to convert:'))
date_from_webkit(inTime)
This morning I found Alex Charchar’s page on ‘the secret canon & page harmony’ as presented in the past by Jan Tschichold.
Using the Van de Graaf Canon, one divides the a page spread thus:
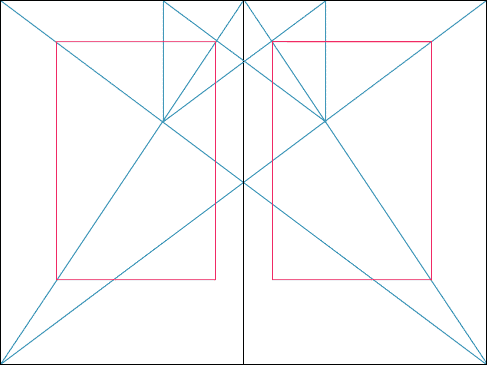
This is based on a 2:3 ratio page size. However, the spread makes the overall ratio 4:3.
Not coincidently, our monitor resolutions are based on a 4:3 ratio:
1024 = 4(256) = 1024
768 = 3(256) = 768
1280 = 4(320)= 1280
960 = 3(320) = 960
We can apply the Van de Graaf Canon to a 1024 x 768 webpage like this:
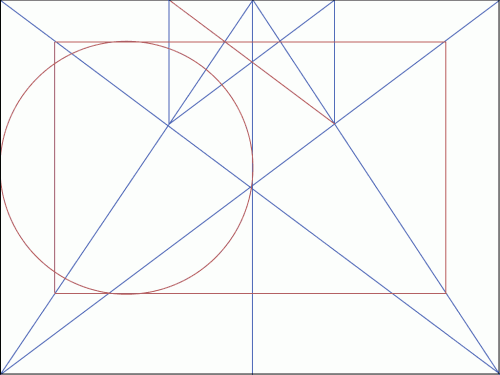
As Tschichold showed, the circle is indicative that height of the resulting textblock is equal to the width of the page, or in our case, ½ of the page (1024/2 = 512).
Tischold’s summarized Van De Graaf’s geometric method as the simplest way to create the outlines that were also used by medieval scribes, which all result in a text-block that fits within a 9 x 9 grid.

(animatd gif from Alex Charchar’s article)
Essentially, we can determine the size and position of a content block by taking any page size and dividing it up into a 9×9 grid.
A book spread which divides both pages into 9 columns results in a grid of 18 columns and 9 rows: however, our 18 rows can be condensed into a 9 x 9 without loss of effect. (Eighteen columns merely subdivides the otherwise 9 into halves).
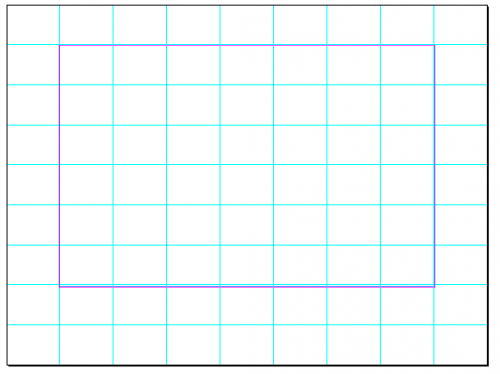
The content block sits 1 column in, two columns above the bottom, and 1 column from the top.

Responsive Web Design
All of this would create a wonderful guideline for laying out the basics of a webpage were this still 2005 and 1024×768 had become the ne-plu-ultra after years of 800×600 CRT monitor resolution settings. Today (early 2012), a webpage needs to resolve on a variety of screens, from iPhones to giant monitors.
In order to have responsive content, it helps to code elements as percentages rather than specific pixels.
Our 1024 x 768 example creates a content block with an 87px top margin, a 166px bottom margin, and side margins of 112. The content box itself measures 800x 512 (the height is equal to half: 1024/2 = 512).
Coding anything in pixels though is unreliable since browser windows are never consistently sized across machines, and padding creates effects which makes pixel precision difficult.
What is needed is to achieve this 9×9 grid with percentages, so that this proportion can be rendered across resolutions.
In order to determine this, I coded a 9 row and 9 column table with a div overalyed using z-index. I fiddled with the css’ size and margin until I got something that matched the constraints.
The result is:
#container {
margin-left: 11%;
margin-right:11%;
height:67%;
width:78%;
margin-top:11%;
}
The page looks like this:
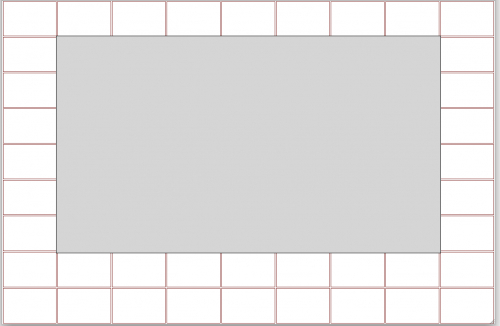
Demo
I ran into a problem using Lightbox plugins on my blogs. I’m currently running modified versions of the Constellation Theme, which is full of HTML 5 goodness and styled to re-flow according to screensize (ie is mobile adaptable).
No matter what Lightbox plugin I’d been using since upgrading WordPress to the latest version (3.3), the overlay was showing a margin and an offset as exemplified below:
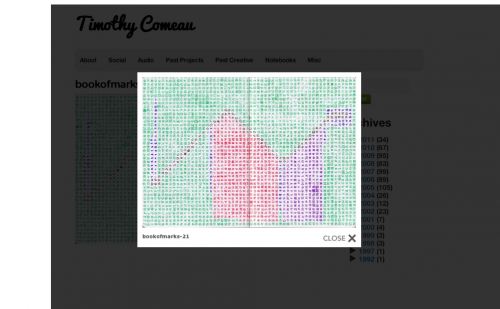
This is because of the way the overlay is codded to effect the < body > tag. Constellation styles the < HTML > tag in ways usually reserved for < body > so by making a change to the Lightbox Javascript file, one can correct this behavior.
In this case, I’m using Ulf Benjaminsson’s wp-jquery-lightbox plugin.
=== Fix ===
1. In `wp-content/plugins/wp-jquery-lightbox/jquery.lightbox.min.js`
2. search for “body”, and it’s found twice as a string in code like the following:
1) ....;a("body").append ....
2) ....;a("body").append ....
which correspond to lines 67 and 71 in the non-minified file.
Change these to HTML:
1) 1) ....;a("html").append ....
2) ....;a("html").append ....
I have some private posts here and there on my various WordPress blogs. WordPress is coded to display the word ‘Private:’ in front of whatever your title is, like this:

I had the thought that it might be better to replace the word with a lock icon, so that it would look like this:

In order to do this, I looked into the WordPress Codex and found the function that inserts the word ‘Private’.
- WordPress’
get_the_title(); function inserts the string `Private`
- this function is coded between lines 104-120 of the
post-template.php file, located in the wp-includes directory.
- line 115 reads like this
$private_title_format = apply_filters('private_title_format', __('Private: %s'));
Now that I knew what to change, I Googled for a lock image and found a no-copyright black one on Wikipedia, at size 360 x 360 pixels. I resized it to 16 x 16, and uploaded to the wp-includes folder. (I didn’t see why it should be in another).
Next, I coded it with an absolute url, since WordPress’s various functions to make clean urls meant that simply using <img src="lock.png"> didn’t work. Line 115 in post-template.php now looked like this example:
$private_title_format = apply_filters('private_title_format', __('<img src="//example.com/wordpress/wp-includes/lock.png"> %s'));
GOAL:
I like how Flickr automatically generates six different sized photos on upload while preserving the original.
Not wanting to be dependent on Flickr for this, I wanted to learn how to do this automagically with my computer. With a developing awareness of the power of Unix, I realized that a command line function was probably the way to go.
So I learned about ImageMagick.
INSTALL:
The recommended method for install is through MacPorts, wherein you simply type
ports install ImageMagick
in Terminal, but I’d tried some MacPorts stuff over the summer which hadn’t worked so I avoided this in lieu of downloading the package from the ImagaMagick host site.
On install however, I immediately ran into a CPU error. This was because the download currently on offer for OS X is complied for 64bit processors, which is fine if you’re using a fairly new machine. My 2006 MacBook is still running with the now obsolete 32 bit processor. Googling this issue led me to a posting on Stack Overflow, where someone with the same problem figured out how to compile the binaries using one of the Unix distributions.
I tried this, but at first I couldn’t get it to work. The issue, it turned out, was that I didn’t have an install of Snow Leopard’s Xcode Developer tools. I’d installed the Developer tools years ago, and so have had the Developer folder on my hard drive, but I also had two hard drive crashes and a couple of system restores in between. This meant that while the files were represented, some of them were out of date, and while I’d updated my system to Snow Leopard, I hadn’t matched the update to the Developer tools.
So, using the Snow Leopard install disk, I ran the install process and got my system up to spec. I then figured I should try MacPorts again, suspecting that my earlier issues had just been resolved via my install of the Dev tools. This turned out to be the case: I installed MacPorts, and on complete, went to Terminal and typed the formula. The list of dependencies began to scroll down the screen, and after about an hour (seriously, it took a while), I had ImageMagick installed, one appropriate for my 32bit system.
However, I couldn’t get ‘display’ to function, but I realized this wasn’t necessary for my ultimate purpose.
MAGICK:
Now that I had my system ready for processing, the next step was to determine the code string to process, which for a relative Unix newbie like me, wasn’t intuitive.
Some Googling helped with this, and the site Perturb.org gave a list, from which I tried this one. First, I cd‘d into the folder that contained the copies of the images I wanted to work on. Then, confirming my location either with the ls or the pwd command, I typed:
for i in `ls *.jpg`; do convert -resize 50% -quality 80 $i conv_$i; done
This didn’t do what I ultimately wanted, but it allowed me to confirm that ImageMagick would work, and begin to give me some clues as to what was going on.
With the help of this post on Cubiq.org, I got this thumbnail script to generate a 75×75 square (as per Flickr’s size):
for i in `ls *.jpg`; do convert -size 75x75 -thumbnail 75x75^ -gravity center -extent 75x75 $i th_$i; done
How this works: i in `ls *.jpg`; that is, make i a variable ($i) containing the listing (ls) of the folder, specifically, the jpgs (*.jpg) of that folder (excluding any other that might exist) and then convert them to -size 75×75 (reiterate a thumbnail of 75×75) with the -gravity of the image centered and output as a file named th_(name in variable $i)
This takes a file named 001.jpg and outputs th_001.jpg
In addition, I had a whole folder of .tif’s which I wanted to convert first to .jpg. Therefore, I used mogrify, which comes with a warning. As it operates on your files it will overwrite the originals if you don’t output them to a folder, as I did. Needless to say, it is always best practice to process copies of images, and never the original/onlycopy.
I mkdir a directory within the folder I cd’d into called jpg. Then, I typed:
mogrify -path jpg -format jpg *.tif
This command converted all the tif files (*.tif) and placed them in the “jpg” folder I’d created (via -path)
Transcribing to Human: use the mogrify command (-path jpg) and place in the jpg folder and change all the files to jpg (-format jpg) that are tiff (*.tiff)
I was now understood how this worked enough to modify it for my end use. I realized that ‘mogrify’ was a better command to use than the ‘convert’ and that I could make a directory as part of the initial conversion, by adding it to the string. I also looked into sharpening the thumbnails, as I was comparing the test runs against those generated by Flickr.
Here, you can see that the Flickr image is a little bit sharper.
I learned that the ‘unsharp’ command is incorrectly named because it is actually what we’d think of as the ‘sharpenning’ option. Thus, my new 75×75 thumbnail command read:
mkdir sq; for i in `ls *.jpg`; do mogrify -size 75x75 -thumbnail 75x75^ -gravity center -unsharp 0x1 -extent 75x75 -path sq $i sq_$i; done
Human: make a directory called `sq` and while the `i` variable is what you find when you do a `ls` that are jpgs, mogrify them to size 75×75 as a thumbnail with the gravity of the image on the centre, and then sharpen them, and make sure they are 75×75 and output them to the `sq` folder you just made, and save them as sq_(what-you-found-when-you-did-the-listing-of-the-folder-of-the-jpgs).
I was happy to see that `unsharp` produced a thumbnail that seemed visibly better than Flickr’s!
Thumbnails are a special case. For simple resizing, the script can also be pared down. I noticed that Flickr resizes according to set widths: 100, 240, 500, 640, 1024. The next issue I had to figure out was how to get ImageMagick to scale proportionally to a set width. I learned that if you give ImageMagick’s mogrify one size, it will assume it is the width and resize accordingly. Thus, to generate an image 100 pixels wide:
mkdir 100; for i in `ls *.jpg`; do mogrify -resize '100' -gravity center -unsharp 0x1 -path 100 $i sq_$i; done
From here, it’s just a matter of entering whatever size you want. As noted above, my script includes a mkdir folder called 100, but that isn’t required, it’s just good to have the output directed to a folder so that the files aren’t overwritten in the processing.
Finally, here are my current list of resizing abracadabra scripts.
mkdir sq; for i in `ls *.jpg`; do mogrify -size 75x75 -thumbnail 75x75^ -gravity center -unsharp 0x1 -extent 75x75 -path sq $i sq_$i; done

mkdir 100; for i in `ls *.jpg`; do mogrify -resize '100' -gravity center -unsharp 0x1 -path 100 $i sq_$i; done

mkdir 240; for i in `ls *.jpg`; do mogrify -resize '240' -gravity center -unsharp 0x1 -path 240 $i sq_$i; done

mkdir 500; for i in `ls *.jpg`; do mogrify -resize '500' -gravity center -unsharp 0x1 -path 500 $i sq_$i; done

mkdir 640; for i in `ls *.jpg`; do mogrify -resize '640' -gravity center -unsharp 0x1 -path 640 $i sq_$i; done
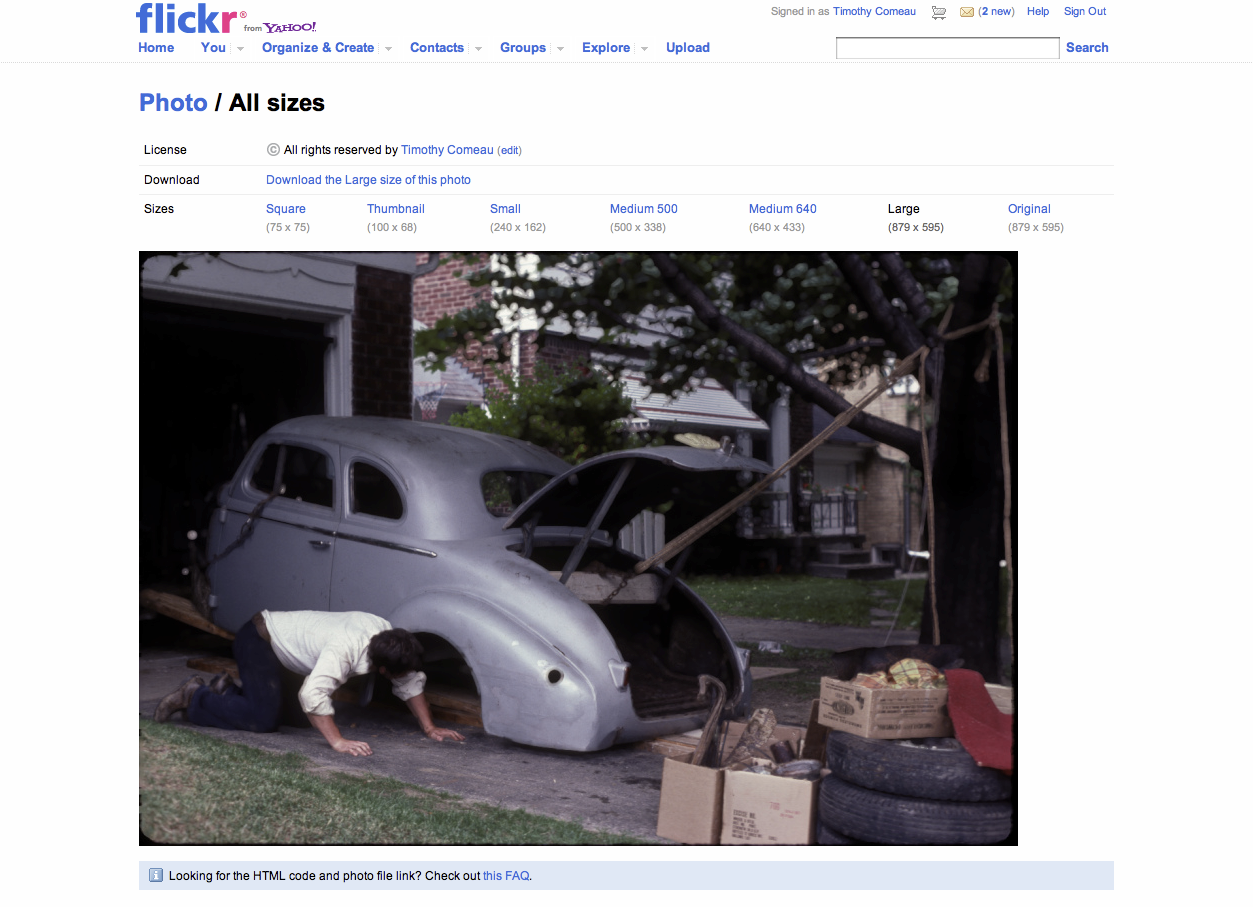
(The photo is of my father examining the body of his 1939 Oldsmobile in the driveway of our home in Etobicoke in the late 1970s).


